
The Bulletproof Core:
A Beginner Friendly Crunch-less
Abs Workout at Home
Crunches are the ultimate go-to for surface-level "six-pack" definition, but traditional crunching carries a massive hidden cost. The repetitive forward bending forces intense compressive pressure directly onto your spinal discs—making overdone crunches a fast track to painful lower back strains, herniated discs, and rounded forward posture.Your abdominal muscles are meant to act as a natural internal corset, stabilizing your torso and keeping your pelvis properly aligned. When your abs are strong and function correctly, they pull your ribs and pelvis into balance, preventing lower-back arching and supporting an upright, confident posture throughout the day.Because your long-term joint health and spinal alignment matter infinitely more than a single exercise, the beginner-friendly routine below completely eliminates crunches to protect your spine. By focusing on isometric bracing rather than high-friction flexing, you train your abs to support your spine and improve your posture without the wear and tear. But before you drop to the floor, you must master the ultimate safety mechanism: the brace.
IMPORTANT: Learning the difference between Bracing vs. Sucking In
To train safely and get real results, you must ditch a common, exhausting mistake: "engaging your core" does not mean sucking in your stomach. Sucking in actually deactivates your deep stabilizing muscles, throws off your pelvic alignment, and leaves your spine completely vulnerable.Instead, you need to brace. Imagine someone is about to suddenly punch you in the gut; your instant, natural reflex to stiffen and push outward creates a rigid "360-degree shield" that locks your spine in place and forces your abs to do 100% of the work.
How to Practice the "360-Degree Brace" (30 Seconds):
-Place your hands on your waist: Put your thumbs on your lower back and your fingers on your side and front abs.-Inhale into your belly: Take a deep breath, feeling your hands expand outward.-Brace and push: Exhale slightly and stiffen your midsection as if preparing for impact, pushing your fingers and thumbs outward with your muscles.-Breathe behind the shield: Hold that rigid tension locked in while taking calm, normal, shallow breaths.
By mastering this brace before your warm-up, you guarantee that your core—not your neck, hips, or lower back—absorbs every ounce of tension. Now that your midsection is officially locked in, you’re ready for the warm-up!
The Warm-up
Before hitting the main workout, we need to gently wake up your spine, activate those important deep core stabilizers, and get some fluid, healthy movement rolling through your main joints.Make sure to flow smoothly from one movement right into the next, treating the list like a continuous loop. Once you complete the very last exercise, take a quick breath to reset, and then jump right back into the start for your desired number of rounds!
1. Cat-Cow(10 reps)
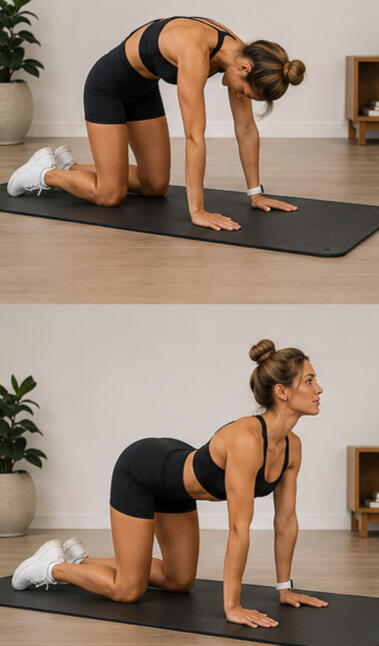
Set yourself up on all fours in a comfortable tabletop position. As you breathe in, let your stomach relax down toward the floor, lift your chest, and look forward slightly.As you breathe out, push down through your hands, arch your upper back toward the sky like a stretching cat, and gently drop your head. Move slowly and mindfully with your breathing for 10 full reps to loosen up your spine.
2. Bird Dog(6 reps per side)
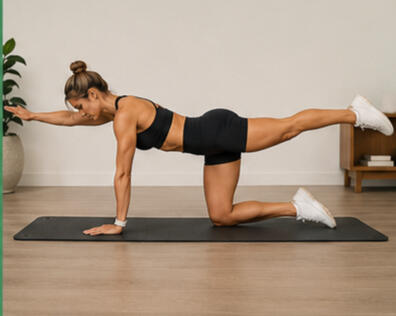
From that same tabletop position, tighten your midsection. Reach your right arm straight ahead while simultaneously pressing your left leg straight out behind you, visualizing a perfectly straight line from your fingertips all the way to your heel.Pause at the top for a moment to lock in your balance, return to center, and then swap sides. Aim for 6 controlled reps on each side.
3. Arm Circles(30 seconds)
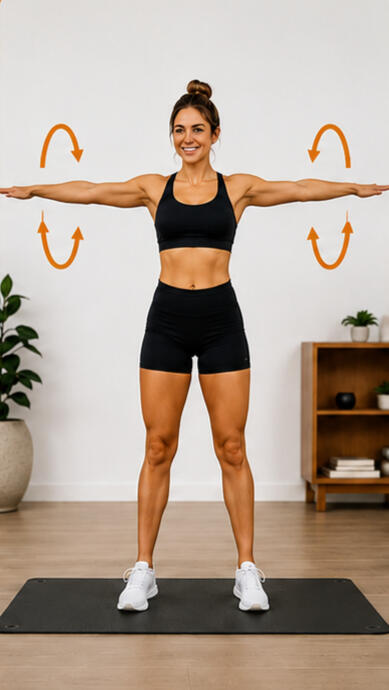
Come up to a standing position with your feet set about hip-width apart and stretch your arms out wide to your sides.Start spinning your arms in small, tight, controlled circles, slowly letting the circles get a bit wider as your shoulders start to thaw out. Keep a steady pace going for a full 30 seconds.
4. Hip Rotations(30 seconds)
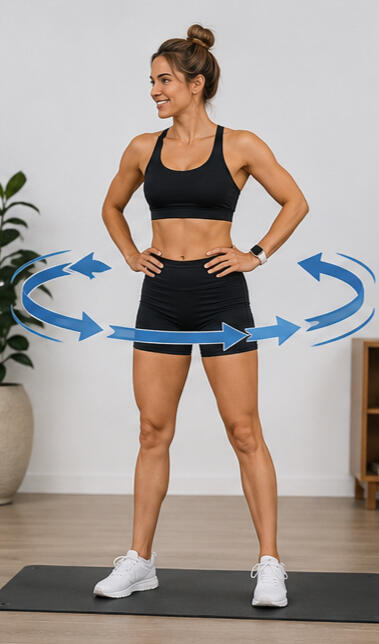
Put your hands on your hips and step your feet out just slightly wider than hip-width. Pretend you're spinning an invisible hula hoop—smoothly guide your hips in a large, relaxed circle to open up the hip joints.Spend the first 15 seconds looping in one direction, then switch things up and rotate the opposite way for the final 15 seconds.
[Quick Note Before You Start the main workout]
Training your abs builds a strong core, but losing the layer of fat on top happens entirely in the kitchen.If you are working out hard but your diet is holding you back, I recommend checking out Metabolic Cooking. It includes over 250 quick, metabolism boosting recipes designed to help you lean down without starving yourself so your hard work actually shows.(Disclosure: the link below is an affiliate link, and i earn a commission if you make a purchase at no extra cost to you).
Click here to check out the Metabolic Cooking Cookbook
Now that your nutrition strategy is set, lets dive right into the main workout of our crunchless core workout routine to build deep, functional abdominal strength without ever straining your neck or lower back on the floor!
The Main Workout
Work through each movement for the recommended time, followed by a 15–20 second breather. Once you hit the end of the list, rest for a minute, then repeat for 3 total rounds.(To keep your technique perfectly on point, I’ve put together a handy infographic visual guide below. Use this visual breakdown alongside the step-by-step explanations to master your form, target the right muscles, and get the absolute most out of this core workout.)
1. Forearm Plank
(25-35 seconds)
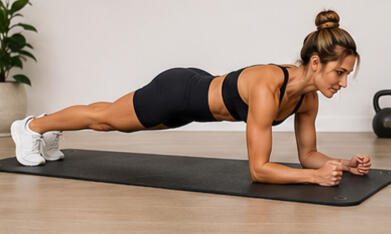
The ultimate test of full-body tension, designed to lock in your deep abdominal wall and protect your lower back.Proper Form: Drop down onto your forearms and step your feet back, creating a perfectly straight line from the back of your head all the way to your heels. Don't just passive-hold this—actively squeeze your glutes and pull your belly button up and in to brace your midsection. As you get tired, your lower back will naturally want to bow out, so stay sharp and fight the urge to let your hips sag toward the mat.
2. Side Plank
(10-15 seconds both sides)
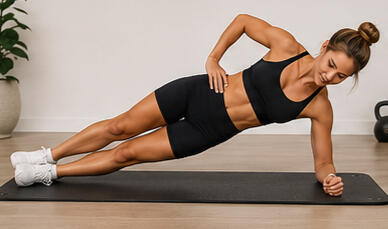
A fantastic way to target your obliques(the sides of your core) while building serious hip stability.Proper Form: Lie on your side, prop yourself up on one forearm, and stack your feet together. Press your hips up high toward the ceiling until your body forms a clean diagonal line.If it feels a bit too intense right now, just bend your bottom knee and rest it on the floor for a more supportive option. Want a bigger challenge? Test your balance by raising your top leg into the air. Just make sure to flip over and hit the exact same variation on the other side!
3. Dead Bug
(12 reps per side)
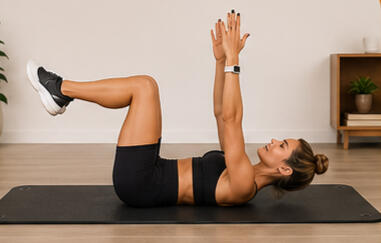
Teaches your body how to move your limbs while keeping your lower back completely anchored and stable.Proper Form: Lie flat on your back, extend your arms straight up over your chest, and bend your knees at a 90-degree angle. From here, slowly lower your opposite arm and leg away from each other toward the floor
(imagine your doing Bird-Dog, but on your back).The golden rule here is to use your abs to press your lower back firmly into the ground so no air can pass under it. Bring them back to the center with total control, and then swap sides.
4. Bird Dog
(12 reps per side)
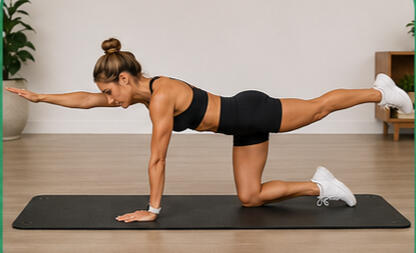
Great for working the entire backside of your body (your posterior chain) and mastering cross-body balance.Proper Form: Start on your hands and knees in a tabletop position on your mat. At the same time, reach one arm straight out in front of you while driving the opposite leg straight out behind you.Think about reaching for opposite walls rather than kicking upward. Hold that line for a second or two to completely find your balance, then slowly bring them back and switch sides.(You might notice that this exercise appears in both our warm-up and the main workout. This was done as this exercise is considered by experts to be one of the best for building maximum core stability while having minimal lower-back strain, in the warm up you were waking the muscles up, here your building endurance!)
5. Glute Bridge March
(12 reps per leg raises)
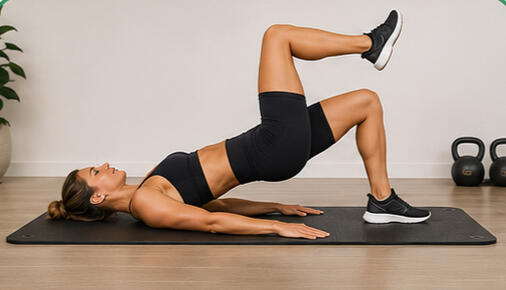
Fires up your glutes and hamstrings while forcing your core to prevent your hips from rocking side to side.Proper Form: Lie on your back with your knees bent and feet flat on the floor, then drive through your heels to lift your hips up into a standard glute bridge.Once you’re locked in at the top, lift one foot off the floor at a time, bringing your knee toward your chest in a marching motion. Your main goal here is to keep your hips completely level and steady—don't let one side drop when you lift a foot.
6. Bear Hold
(20-30 seconds)
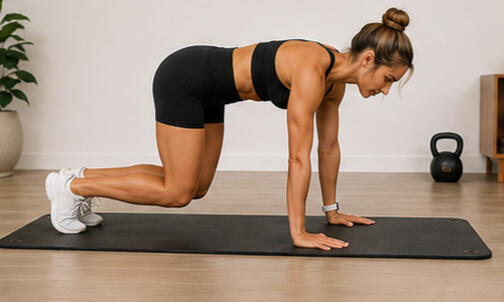
A sneaky, high-intensity burner that fires up your quads, shoulders, and deep abdominal wall all at once.Proper Form: Get on all fours with your hands directly under your shoulders and your knees directly under your hips. Tuck your toes, brace your core, and press into the floor just enough to hover your knees about an inch or two off the ground.It doesn't look like much, but it’s tough! Just hold that hover right there, keep your back flat like a table, and focus on taking calm, steady breaths.
7. Mountain Climbers
(10 per leg, 20 total)
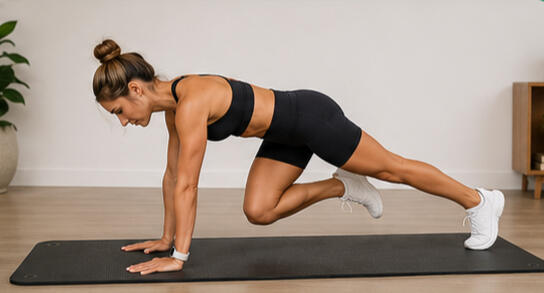
This turns a cardio exercise into a brutal core stability test by removing all your momentum.Proper Form: Set up in a strong, high push-up position. Instead of running your legs out as fast as you can, I want you to go slow. Drive one knee in toward your chest deliberately, hold it for a split second, and then return it to the start before switching to the other leg.Forget about speed here—focus entirely on keeping your torso like a rock and maintaining a perfectly stable frame.
Progression
As your core strength develops and your stamina increases, you will need to introduce new challenges to keep your muscles adapting. When the standard routine starts to feel comfortable, use these progression strategies to level up:Shorten Your Rest: Keep your muscles under tension longer by dropping your rest intervals down to just 10 seconds between exercises.Add a 4th Round: If you finish the standard 3 rounds and feel like you still have gas left in the tank, challenge yourself to tackle a grueling fourth round to empty the tank.Slow Down the Tempo: Speed is often a way to cheat using momentum. Force your core to work twice as hard by slowing down the lowering (eccentric) phase of each movement. Count to 3 on the way down, pause for a second at the point of maximum tension, and feel the difference.
Weekly Schedule
Monday: Core Routine (Session 1)
Kickstart your week with maximum energy. Focus heavily on mastering the 360-degree brace right from the first rep.Tuesday: Rest & Recovery
Let your muscles rebuild. Focus on light movement like walking, staying hydrated, and keeping your nutrition on track.Wednesday: Core Routine(Session 2)
Mid-week check-in. This is where consistency is built. Even if your energy is slightly lower, prioritize flawless form over speed.Thursday: Rest & Recovery
Another dedicated rest day to prevent cumulative fatigue and keep your lower back feeling fresh and supported.Friday: Core Routine (Session 3)
Finish the workweek strong. Push yourself to maintain a tight, locked-in midsection even as fatigue starts to set in during the final rounds.Saturday & Sunday: Rest / Active Recovery
Enjoy your weekend! Keep your body moving with active recovery like hiking, cycling, yoga, or mobility work to keep stiffness at bay.
If you are an advanced trainee, or if you find yourself feeling exceptionally well-recovered, energized, and completely free of any lower-back soreness by the weekend, you can introduce a fourth session on Saturday.However, treat this fourth session as a bonus, not a requirement. If your body is screaming for rest, honor that signal—more is not always better, and a well-rested core will always perform better on Monday morning than an overtrained one!
Additional Tips
Keep your breathing steady: It is a natural human reflex to hold your breath when an exercise gets tough, but starving your muscles of oxygen is the fastest way to fatigue early and spike your blood pressure. Your abdominal muscles need a constant supply of oxygen to contract effectively. Focus on taking calm, controlled, rhythmic breaths throughout every movement. A great rule of thumb is to exhale deeply during the hardest part of the exercise (the exertion) and inhale as you return to the starting position.Quality over quantity: In the world of core training, ego is the ultimate enemy. It is incredibly easy to let your form slip just to chase a higher rep count or a longer timer. Always prioritize perfect, flawless form over hitting a specific time goal. A rock-solid, highly engaged 20-second plank will always build more strength and definition than a sloppy, lower-back-sagging 45-second plank. If your form starts to break down, the set is done. Rest, reset, and go again.Listen to your body: There is a massive, highly important difference between the healthy, satisfying "burn" of muscle fatigue and actual physical pain. Muscle burn is a sign of growth and adaptation; joint pain, sharp pinches, or lower-back strain are warning signs of potential injury. If an exercise genuinely hurts, or if you feel the work shifting into your lower back, stop immediately. Take a moment to modify the movement, scale down the intensity, or rest. Consistency is built on staying healthy, not pushing through bad pain.
This routine is beginner-friendly but can be made challenging enough for intermediate exercisers simply by increasing the work time and reducing the rest periods.
Want to Take Your Abs training to the Next Level?
While this 15-minute routine is a fantastic, back-safe starting point, your body will eventually adapt to it. To keep seeing progress, burning fat, and building a genuinely strong core, you need a structured, step-by-step roadmap that challenges your muscles safely over time.Instead of guessing what to do next or doing the same routine forever, check out crunchless core.Why it works so well100% Crunch-Free: Every single workout is engineered to protect your lower back and spine.Complete Progressive Roadmap: A structured 8-week blueprint that provides step-by-step daily guidance and scheduling so you know exactly how to progress.Follow-Along Video Guides: Perfect form cues so you can train with total confidence at home.
(Heads-up: The links above are affiliate links. If you decide to pick it up, I earn a small commission at zero extra cost to you. Thank you so much for supporting this page and keeping it free!)
if your interested, you can also check out my home page below for more workout routines and advice